
Dart Programming - Operators


Dart Programming - Operators


An expression is a special kind of statement that evaluates to a value. Every expression is composed of −

  • Operands − Represents the data

  • Operator − Defines how the operands will be processed to produce a value.

Consider the following expression – "2 + 3". In this expression, 2 and 3 are operands and the symbol "+" (plus) is the operator.

In this chapter, we will discuss the operators that are available in Dart.

  • Arithmetic Operators
  • Equality and Relational Operators
  • Type test Operators
  • Bitwise Operators
  • Assignment Operators
  • Logical Operators

Arithmetic Operators

The following table shows the arithmetic operators supported by Dart.

Show Examples

Sr.NoOperators & Meaning
1+

Add

2

Subtract

3-expr

Unary minus, also known as negation (reverse the sign of the expression)

4*

Multiply

5/

Divide

6~/

Divide, returning an integer result

7%

Get the remainder of an integer division (modulo)

8++

Increment

9--

Decrement

Equality and Relational Operators

Relational Operators tests or defines the kind of relationship between two entities. Relational operators return a Boolean value i.e. true/ false.

Assume the value of A is 10 and B is 20.

Show Examples

OperatorDescriptionExample
>Greater than(A > B) is False
<Lesser than(A < B) is True
>=Greater than or equal to(A >= B) is False
<=Lesser than or equal to(A <= B) is True
==Equality(A==B) is False
!=Not equal(A!=B) is True

Type test Operators

These operators are handy for checking types at runtime.

Show Examples

OperatorMeaning
isTrue if the object has the specified type
is!False if the object has the specified type

Bitwise Operators

The following table lists the bitwise operators available in Dart and their role −

Show Examples

OperatorDescriptionExample
Bitwise ANDa & bReturns a one in each bit position for which the corresponding bits of both operands are ones.
Bitwise ORa | bReturns a one in each bit position for which the corresponding bits of either or both operands are ones.
Bitwise XORa ^ bReturns a one in each bit position for which the corresponding bits of either but not both operands are ones.
Bitwise NOT~ aInverts the bits of its operand.
Left shifta ≪ bShifts a in binary representation b (< 32) bits to the left, shifting in zeroes from the right.
Signpropagating right shifta ≫ bShifts a in binary representation b (< 32) bits to the right, discarding bits shifted off.

Assignment Operators

The following table lists the assignment operators available in Dart.

Show Examples

Sr.NoOperator & Description
1=(Simple Assignment )

Assigns values from the right side operand to the left side operand

Ex:C = A + B will assign the value of A + B into C

2??=

Assign the value only if the variable is null

3+=(Add and Assignment)

It adds the right operand to the left operand and assigns the result to the left operand.

Ex: C += A is equivalent to C = C + A

4─=(Subtract and Assignment)

It subtracts the right operand from the left operand and assigns the result to the left operand.

Ex: C -= A is equivalent to C = C – A

5*=(Multiply and Assignment)

It multiplies the right operand with the left operand and assigns the result to the left operand.

Ex: C *= A is equivalent to C = C * A

6/=(Divide and Assignment)

It divides the left operand with the right operand and assigns the result to the left operand.

Note − Same logic applies to Bitwise operators, so they will become ≪=, ≫=, ≫=, ≫=, |= and ^=.

Logical Operators

Logical operators are used to combine two or more conditions. Logical operators return a Boolean value. Assume the value of variable A is 10 and B is 20.

Show Examples

OperatorDescriptionExample
&&

And − The operator returns true only if all the expressions specified return true

(A > 10 && B > 10) is False.
||

OR − The operator returns true if at least one of the expressions specified return true

(A > 10 || B > 10) is True.
!

NOT − The operator returns the inverse of the expression’s result. For E.g.: !(7>5) returns false

!(A > 10) is True.

Conditional Expressions

Dart has two operators that let you evaluate expressions that might otherwise require ifelse statements −

condition ? expr1 : expr2

If condition is true, then the expression evaluates expr1 (and returns its value); otherwise, it evaluates and returns the value of expr2.

expr1 ?? expr2

If expr1 is non-null, returns its value; otherwise, evaluates and returns the value of expr2

Example

The following example shows how you can use conditional expression in Dart −

void main() { 
   var a = 10; 
   var res = a > 12 ? "value greater than 10":"value lesser than or equal to 10"; 
   print(res); 
} 

It will produce the following output −

value lesser than or equal to 10

Dart Programming - Loops

At times, certain instructions require repeated execution. Loops are an ideal way to do the same. A loop represents a set of instructions that must be repeated. In a loop’s context, a repetition is termed as an iteration.

The following figure illustrates the classification of loops −

Classification Of Loops

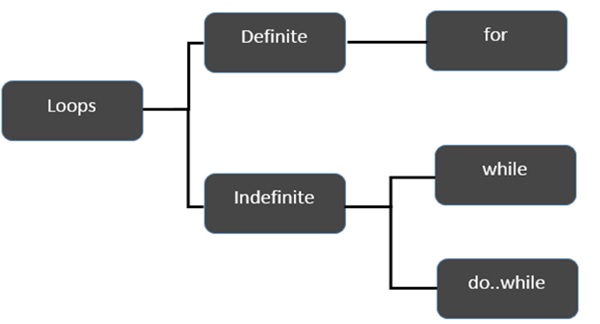
Let’s start the discussion with Definite Loops. A loop whose number of iterations are definite/fixed is termed as a definite loop.

Sr.NoLoop & Description
1for loop

The for loop is an implementation of a definite loop. The for loop executes the code block for a specified number of times. It can be used to iterate over a fixed set of values, such as an array

2for…in Loop

The for...in loop is used to loop through an object's properties.

Moving on, let’s now discuss the indefinite loops. An indefinite loop is used when the number of iterations in a loop is indeterminate or unknown. Indefinite loops can be implemented using −

Sr.NoLoop & Description
1while Loop

The while loop executes the instructions each time the condition specified evaluates to true. In other words, the loop evaluates the condition before the block of code is executed.

2do…while Loop

The do…while loop is similar to the while loop except that the do...while loop doesn’t evaluate the condition for the first time the loop executes.

Let us now move on and discuss the Loop Control Statements of Dart.

Sr.NoControl Statement & Description
1break Statement

The break statement is used to take the control out of a construct. Using break in a loop causes the program to exit the loop. Following is an example of the break statement.

2continue Statement

The continue statement skips the subsequent statements in the current iteration and takes the control back to the beginning of the loop.

Using Labels to Control the Flow

label is simply an identifier followed by a colon (:) that is applied to a statement or a block of code. A label can be used with break and continue to control the flow more precisely.

Line breaks are not allowed between the ‘continue’ or ‘break’ statement and its label name. Also, there should not be any other statement in between a label name and an associated loop.

Example: Label with Break

void main() { 
   outerloop: // This is the label name 
   
   for (var i = 0; i < 5; i++) { 
      print("Innerloop: ${i}"); 
      innerloop: 
      
      for (var j = 0; j < 5; j++) { 
         if (j > 3 ) break ; 
         
         // Quit the innermost loop 
         if (i == 2) break innerloop; 
         
         // Do the same thing 
         if (i == 4) break outerloop; 
         
         // Quit the outer loop 
         print("Innerloop: ${j}"); 
      } 
   } 
}

The following output is displayed on successful execution of the above code.

Innerloop: 0
Innerloop: 0
Innerloop: 1
Innerloop: 2
Innerloop: 3
Innerloop: 1
Innerloop: 0
Innerloop: 1
Innerloop: 2
Innerloop: 3
Innerloop: 2
Innerloop: 3
Innerloop: 0
Innerloop: 1
Innerloop: 2
Innerloop: 3
Innerloop: 4

Example: Label with continue

void main() { 
   outerloop: // This is the label name 
   
   for (var i = 0; i < 3; i++) { 
      print("Outerloop:${i}"); 
      
      for (var j = 0; j < 5; j++) { 
         if (j == 3){ 
            continue outerloop; 
         } 
         print("Innerloop:${j}"); 
      } 
   } 
}

The following output is displayed on successful execution of the above code.

Outerloop: 0 
Innerloop: 0 
Innerloop: 1 
Innerloop: 2 

Outerloop: 1 
Innerloop: 0 
Innerloop: 1 
Innerloop: 2 

Outerloop: 2 
Innerloop: 0 
Innerloop: 1 
Innerloop: 2 

Comments

All Post

When to Use Waterfall vs. Agile

  We compare the benefits and drawbacks of using two well-known software development methodologies, Waterfall and Agile, and lay out when it might be more suitable to use one over the other – or combine practices of both – for your product initiative. When developing a new software product, your team will need to navigate which development methodology is right for your initiative. In the world of managing  software development  projects, the topic of Agile vs Waterfall is widely debated. Many thought leaders and Agile enthusiasts in the industry have argued Waterfall is dead, however, traditional organizational environments and processes have led to it still being widely used today. A 2017 report from the Project Management Institute shows that  51% of the organizations surveyed use Waterfall either often or always . The reality is, each software development project poses its own unique challenges and requirements. It’s not a matter of deciding which development methodology is “the bes

Flutter form validation: Full guide for you to make Flutter form

  Flutter form validation Getting started with form validation in Flutter The Flutter SDK provides us with an out-of-the-box widget and functionalities to make our lives easier when using form validation. In this article, we’ll cover two approaches to form validation: the form widget and the Provider package. You can find more information on these two approaches in the official Flutter docs. Creating a form in Flutter First, we are going to create a simple login page that has the following fields: Email Name Phone number Password For the validation, we want the users of our app to fill in the correct details in each of these fields. The logic will be defined as such: First, for the name field, we want the user to enter a valid first name and last name, which can be accompanied by initials. For the email field, we want a valid email that contains some characters before the “@” sign, as well as the email domain at the end of the email. For phone number validation, the user is expected to

How to change the language on Android at runtime and don’t go mad

  How to change the language on Android at runtime and don’t go mad TL;DR There is a library called Lingver that implements the presented approach with just a few lined of code.  Check it out! Introduction The topic is old as the hills, but still is being actively discussed among developers due to frequent API and behavior changes. The goal of this post is to gather all tips and address all pitfalls while implementing this functionality. Disclaimer Changing the language on Android at runtime was never officially encouraged or documented. The resource framework automatically selects the resources that best match the device. Such behavior is enough for common applications, so just make sure you have strict reasons to change it before proceeding further. There are a ton of articles and answers on Stack Overflow but they usually lack enough of explanation. As a result, when this functionality gets broken, developers can’t easily fix it due to the messy API and lots of deprecated things. We

7 Key Android Concepts

  Although the Android platform is open and customizable, Android users have become accustomed to constructs developed by Google for Android devices. Although the Android platform is open and customizable, Android users have become accustomed to constructs developed by Google for Android devices. Moreover, the use of these Android concepts is vital in developing an application quickly – custom Android designs can take up to 10 times longer! Android UI Controls Android provides a number of standard UI controls that  enable a rich user experience . Designers and developers should thoroughly understand all of these controls for the following reasons: They are faster to implement. It can take up to ten times longer to develop a custom control than to implement a user interface with standard Android controls. They ensure good performance. Custom controls rarely function as expected in their first implementation. By implementing standard controls, you can eliminate the need to test, revise a

How to them the background of the Android options menu items

  “What we’ve got here is… failure to theme. Some views you just can’t reach. So you get what we had here last project, which is the way Android wants it… well, it gets it. I don’t like it any more than you men.” – Captain, Road Prison 36 Some of you might recognize the previous paragraph as the introduction of Guns ‘N Roses’ Civil War or from the movie Cold Hand Luke starring Paul Newman. This is the feeling I get when I try to create a custom theme for an application on Android. The Android SDK does permit some level of theming, which is not really well documented to start with. Other things are hard-coded, “so you get what we had here last project”. Now, one of the things your application will most likely use is the Options menu, which is the menu you see when you press the hard menu key. It is kind of… orange. In our last project, we had to completely remove the orange in favor of our customer’s color scheme, which is on the blue side. I couldn’t find a way to change the menu item

Clean Code and the Art of Exception Handling

  Clean Code and the Art of Exception Handling Exceptions are as old as programming itself. An unhandled exception may cause unexpected behavior, and results can be spectacular. Over time, these errors have contributed to the impression that exceptions are bad. But exceptions are a fundamental element of modern programming. Rather than fearing exceptions, we should embrace them and learn how to benefit from them. In this article, we will discuss how to manage exceptions elegantly, and use them to write clean code that is more maintainable. Exceptions are as old as programming itself. Back in the days when programming was done in hardware, or via low-level programming languages, exceptions were used to alter the flow of the program, and to avoid hardware failures. Today, Wikipedia  defines exceptions as: anomalous or exceptional conditions requiring special processing – often changing the normal flow of program execution specialized programming language constructs or computer hardware m

Android Jetpack Compose

  Jetpack Compose Tutorial for Android: Getting Started Jetpack Compose is Android’s modern toolkit for building native UI. It simplifies and accelerates UI development on Android. Quickly bring your app to life with less code, powerful tools, and intuitive Kotlin APIs. At Google I/O 2019, Google first announced  Jetpack Compose . Jetpack Compose is Google’s response to the declarative UI framework trend, which the Android team is developing to fundamentally change the way developers create UI, making it easier and faster to write, and more performant to run. It is a part of the Jetpack suite of libraries and as such should provide compatibility throughout platform versions, removing the need to avoid certain features, because you’re targeting lower-end devices or older versions of Android. Although it’s still in an alpha , Compose is already making big waves in the Android community. If you want to stay up-to-date on the latest and greatest technology, read on! In this tutorial, you’

Loops in Dart 💪💪💪😎😎😎

       Loops in Dart   💪💪💪😎😎😎 Dart Loops In Programming, loops are used to repeat a block of code until certain conditions are not completed. For, e.g., if you want to print your name 100 times, then rather than typing print(“your name”); 100 times, you can use a loop. There are different types of loop in Dart. They are: For Loop For Each Loop While Loop Do While Loop Info Note : The primary purpose of all loops is to repeat a block of code. Print Your Name 10 Times Without Using Loop Let’s first print the name 10 times without using a loop. void main() { print( "John Doe" ); print( "John Doe" ); print( "John Doe" ); print( "John Doe" ); print( "John Doe" ); print( "John Doe" ); print( "John Doe" ); print( "John Doe" ); print( "John Doe" ); print( "John Doe" ); } Show Output

MVVM architecture, ViewModel and LiveData (Part 1)

  MVVM architecture, ViewModel and LiveData (Part 1) During Google I/O, Google introduced  architecture components  which includes  LiveData  and  ViewModel  which facilitates developing Android app using MVVM pattern. This article discusses how can these components serve an android app that follows MVVM. Quick Definition of MVVM If you are familiar with MVVM, you can skip this section completely. MVVM is one of the architectural patterns which enhances separation of concerns, it allows separating the user interface logic from the business (or the back-end) logic. Its target (with other MVC patterns goal) is to achieve the following principle  “Keeping UI code simple and free of app logic in order to make it easier to manage” . MVVM has mainly the following layers: Model Model represents the data and business logic of the app. One of the recommended implementation strategies of this layer, is to expose its data through observables to be decoupled completely from ViewModel or any other