
Dart Programming - Exceptions
An exception (or exceptional event) is a problem that arises during the execution of a program. When an Exception occurs the normal flow of the program is disrupted and the program/Application terminates abnormally.
Built-in Dart exceptions include −
| Sr.No | Exceptions & Description |
|---|---|
| 1 | DeferredLoadException Thrown when a deferred library fails to load. |
| 2 | FormatException Exception thrown when a string or some other data does not have an expected format and cannot be parsed or processed. |
| 3 | IntegerDivisionByZeroException Thrown when a number is divided by zero. |
| 4 | IOException Base class for all Inupt-Output related exceptions. |
| 5 | IsolateSpawnException Thrown when an isolate cannot be created. |
| 6 | Timeout Thrown when a scheduled timeout happens while waiting for an async result. |
Every exception in Dart is a subtype of the pre-defined class Exception. Exceptions must be handled to prevent the application from terminating abruptly.
The try / on / catch Blocks
The try block embeds code that might possibly result in an exception. The on block is used when the exception type needs to be specified. The catch block is used when the handler needs the exception object.
The try block must be followed by either exactly one on / catch block or one finally block (or one of both). When an exception occurs in the try block, the control is transferred to the catch.
The syntax for handling an exception is as given below −
try {
   // code that might throw an exception
}
on Exception1 {
   // code for handling exception
}
catch Exception2 {
   // code for handling exception
}
Following are some points to remember −
A code snippet can have more than one on / catch blocks to handle multiple exceptions.
The on block and the catch block are mutually inclusive, i.e. a try block can be associated with both- the on block and the catch block.
The following code illustrates exception handling in Dart −
Example: Using the ON Block
The following program divides two numbers represented by the variables x and y respectively. The code throws an exception since it attempts division by zero. The on block contains the code to handle this exception.
main() {
   int x = 12;
   int y = 0;
   int res;

   try {
      res = x ~/ y;
   }
   on IntegerDivisionByZeroException {
      print('Cannot divide by zero');
   }
}
It should produce the following output −
Cannot divide by zero
Example: Using the catch Block
In the following example, we have used the same code as above. The only difference is that the catch block (instead of the ON block) here contains the code to handle the exception. The parameter of catch contains the exception object thrown at runtime.
main() {
   int x = 12;
   int y = 0;
   int res;

   try {
      res = x ~/ y;
   }
   catch(e) {
      print(e);
   }
}
It should produce the following output −
IntegerDivisionByZeroException
Example: on…catch
The following example shows how to use the on...catch block.
main() {
   int x = 12;
   int y = 0;
   int res;

   try {
      res = x ~/ y;
   }
   on IntegerDivisionByZeroException catch(e) {
      print(e);
   }
}
It should produce the following output −
IntegerDivisionByZeroException
The Finally Block
The finally block includes code that should be executed irrespective of an exception’s occurrence. The optional finally block executes unconditionally after try/on/catch.
The syntax for using the finally block is as follows −
try {
   // code that might throw an exception
}
on Exception1 {
   // exception handling code
}
catch Exception2 {
   //  exception handling
}
finally {
   // code that should always execute; irrespective of the exception
}
The following example illustrates the use of finally block.
main() {
   int x = 12;
   int y = 0;
   int res;

   try {
      res = x ~/ y;
   }
   on IntegerDivisionByZeroException {
      print('Cannot divide by zero');
   }
   finally {
      print('Finally block executed');
   }
}
It should produce the following output −
Cannot divide by zero
Finally block executed
Throwing an Exception
The throw keyword is used to explicitly raise an exception. A raised exception should be handled to prevent the program from exiting abruptly.
The syntax for raising an exception explicitly is −
throw new Exception_name()
Example
The following example shows how to use the throw keyword to throw an exception −
main() {
   try {
      test_age(-2);
   }
   catch(e) {
      print('Age cannot be negative');
   }
}
void test_age(int age) {
   if(age<0) {
      throw new FormatException();
   }
}
It should produce the following output −
Age cannot be negative
Custom Exceptions
As specified above, every exception type in Dart is a subtype of the built-in class Exception. Dart enables creating custom exceptions by extending the existing ones. The syntax for defining a custom exception is as given below −
Syntax: Defining the Exception
class Custom_exception_Name implements Exception {
   // can contain constructors, variables and methods
}
Custom Exceptions should be raised explicitly and the same should be handled in the code.
Example
The following example shows how to define and handle a custom exception.
class AmtException implements Exception {
   String errMsg() => 'Amount should be greater than zero';
}
void main() {
   try {
      withdraw_amt(-1);
   }
   catch(e) {
      print(e.errMsg());
   }
   finally {
      print('Ending requested operation.....');
   }
}
void withdraw_amt(int amt) {
   if (amt <= 0) {
      throw new AmtException();
   }
}
In the above code, we are defining a custom exception, AmtException. The code raises the exception if the amount passed is not within the excepted range. The main function encloses the function invocation in the try...catch block.
The code should produce the following output −
Amount should be greater than zero
Ending requested operation....
Dart Programming - Debugging
Every now and then, developers commit mistakes while coding. A mistake in a program is referred to as a bug. The process of finding and fixing bugs is called debugging and is a normal part of the development process. This section covers tools and techniques that can help you with debugging tasks.
The WebStorm editor enables breakpoints and step-by-step debugging. The program will break at the point where the breakpoint is attached. This functionality is like what you might expect from Java or C# application development. You can watch variables, browse the stack, step over and step into method and function calls, all from the WebStorm Editor.
Adding a Breakpoint
Consider the following code snippet. (TestString.dart)
void main() {
   int a = 10, b = 20, c = 5;
   c = c * c * c;

   print("$a + $b = ${a+b}");
   print("$a%$b = ${a%b}");  // Add a break point here
   print("$a*$b = ${a*b}");
   print("$a/$b = ${a/b}");
   print(c);
}
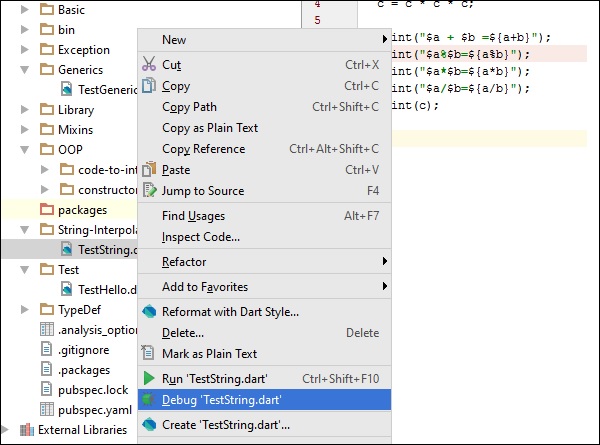
To add a breakpoint, click on the left margin to. In the figure given below, line number 7 has a break point.

Run the program in debug mode. In the project explorer right click on the dart program in our case TestString.dart.
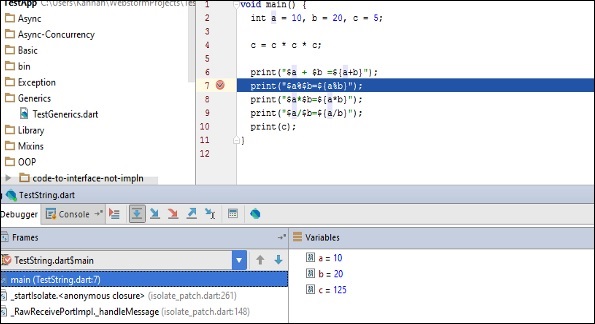
Once the program runs in debug mode, you will get the Debugger window as shown in the following screenshot. The variables tab shows the values of variables in the current context. You can add watchers for specific variables and listen to that values changes using watches window.
Step Into (F7) arrow icon on debug menu helps to Executes code one statement at a time. If main methods call a subroutine, then this will go into the subroutine code also.
Step over (F8): It is similar to Step Into. The difference in use occurs when the current statement contains a call to a subroutine. If the main method calls a subroutine, step over will not drill into the subroutine. it will skip the subroutine.
Step Out (Shift+F8): Executes the remaining lines of a function in which the current execution point lies. The next statement displayed is the statement following the subroutine call.
After running in debug mode, the program gives the following output −
10 + 20 = 30
10 % 20 = 10
10 * 20 = 200
10 / 20 = 0.5
125
Dart Programming - Typedef
A typedef, or a function-type alias, helps to define pointers to executable code within memory. Simply put, a typedef can be used as a pointer that references a function.
Given below are the steps to implement typedefs in a Dart program.
Step 1: Defining a typedef
A typedef can be used to specify a function signature that we want specific functions to match. A function signature is defined by a function’s parameters (including their types). The return type is not a part of the function signature. Its syntax is as follows.
typedef function_name(parameters)
Step 2: Assigning a Function to a typedef Variable
A variable of typedef can point to any function having the same signature as typedef. You can use the following signature to assign a function to a typedef variable.
type_def var_name = function_name
Step 3: Invoking a Function
The typedef variable can be used to invoke functions. Here is how you can invoke a function −
var_name(parameters)
Example
Let’s now take an example to understand more on typedef in Dart.
At first, let us define a typedef. Here we are defining a function signature. The function will take two input parameters of the type integer. Return type is not a part of the function signature.
typedef ManyOperation(int firstNo , int secondNo); //function signature
Next, let us define the functions. Define some functions with the same function signature as that of the ManyOperation typedef.
Add(int firstNo,int second){
   print("Add result is ${firstNo+second}");
}
Subtract(int firstNo,int second){
   print("Subtract result is ${firstNo-second}");
}
Divide(int firstNo,int second){
   print("Add result is ${firstNo/second}");
}
Finally, we will invoke the function via typedef. Declare a variable of the ManyOperations type. Assign the function name to the declared variable.
ManyOperation oper ;

//can point to any method of same signature
oper = Add;
oper(10,20);
oper = Subtract;
oper(30,20);
oper = Divide;
oper(50,5);
The oper variable can point to any method which takes two integer parameters. The Add function's reference is assigned to the variable. Typedefs can switch function references at runtime
Let us now put all the parts together and see the complete program.
typedef ManyOperation(int firstNo , int secondNo);
//function signature

Add(int firstNo,int second){
   print("Add result is ${firstNo+second}");
}
Subtract(int firstNo,int second){
   print("Subtract result is ${firstNo-second}");
}
Divide(int firstNo,int second){
   print("Divide result is ${firstNo/second}");
}
Calculator(int a, int b, ManyOperation oper){
   print("Inside calculator");
   oper(a,b);
}
void main(){
   ManyOperation oper = Add;
   oper(10,20);
   oper = Subtract;
   oper(30,20);
   oper = Divide;
   oper(50,5);
}
The program should produce the following output −
Add result is 30
Subtract result is 10
Divide result is 10.0
Note − The above code will result in an error if the typedef variable tries to point to a function with a different function signature.
Example
Typedefs can also be passed as a parameter to a function. Consider the following example −
typedef ManyOperation(int firstNo , int secondNo);   //function signature
Add(int firstNo,int second){
   print("Add result is ${firstNo+second}");
}
Subtract(int firstNo,int second){
   print("Subtract result is ${firstNo-second}");
}
Divide(int firstNo,int second){
   print("Divide result is ${firstNo/second}");
}
Calculator(int a,int b ,ManyOperation oper){
   print("Inside calculator");
   oper(a,b);
}
main(){
   Calculator(5,5,Add);
   Calculator(5,5,Subtract);
   Calculator(5,5,Divide);
}
It will produce the following output −
Inside calculator
Add result is 10
Inside calculator
Subtract result is 0
Inside calculator
Divide result is 1.0
Comments
Post a Comment