

MVVM architecture, ViewModel and LiveData (Part 1)
Quick Definition of MVVM
If you are familiar with MVVM, you can skip this section completely.
MVVM is one of the architectural patterns which enhances separation of concerns, it allows separating the user interface logic from the business (or the back-end) logic. Its target (with other MVC patterns goal) is to achieve the following principle “Keeping UI code simple and free of app logic in order to make it easier to manage”.
MVVM has mainly the following layers:
- Model
Model represents the data and business logic of the app. One of the recommended implementation strategies of this layer, is to expose its data through observables to be decoupled completely from ViewModel or any other observer/consumer (This will be illustrated in our MVVM sample app below). - ViewModel
ViewModel interacts with model and also prepares observable(s) that can be observed by a View. ViewModel can optionally provide hooks for the view to pass events to the model.
One of the important implementation strategies of this layer is to decouple it from the View, i.e, ViewModel should not be aware about the view who is interacting with. - View
Finally, the view role in this pattern is to observe (or subscribe to) a ViewModel observable to get data in order to update UI elements accordingly.
The following diagram shows MVVM components and basic interactions.

LiveData
As said above, LiveData is one of the newly introduced architecture components. LiveData is an observable data holder. This allows the components in your app to be able to observe LiveData objects for changes without creating explicit and rigid dependency paths between them. This decouples completely the LiveData object producer from the LiveData object consumer.
Adding to this, there is also a great benefit in LiveData, LiveData respects the lifecycle state of your app components (activities, fragments, services) and handles object life cycle management which ensures that LiveData objects do not leak.
As per Google Docs, If you are already using a library like Rx or Agera, you can continue using them instead of LiveData. But in this case, it is your responsibility to handle object allocation and de-allocation per Android components life cycle.
Since LiveData respects Android Lifecycle, this means it will not invoke its observer callback unless the LiveData host (activity or fragment) is in an active state (received onStart() but did not receive onStop() for example). Adding to this, LiveData will also automatically remove the observer when the its host receives onDestroy().
LiveData will be illustrated in our MVVM sample app below.
ViewModel
ViewModel is also one of the newly introduced architecture components. Architecture components provide a new class called ViewModel, which is responsible for preparing the data for the UI/View.
ViewModel gives you a good base class for your MVVM ViewModel layer since ViewModel (and its children AndroidViewModel)’s extending classes are automatically having their holding data retained during configuration changes. This means that after configuration changes, this ViewModel holded data is immediately available to the next activity or fragment instance.
The following diagram shows the life cycle of ViewModel component.
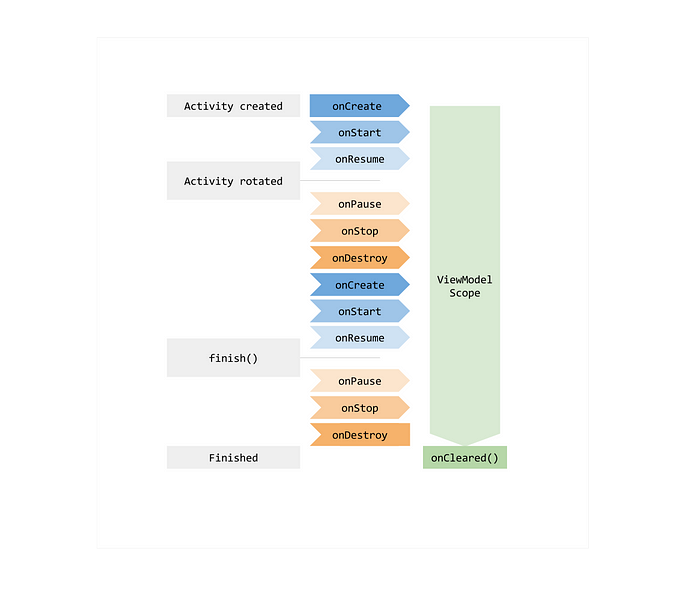
ViewModel will also be illustrated in our MVVM sample app below.
Sample App
Now, let’s come the most interesting part, let’s put all of these things together in a sample app. This MVVM Sample app contains mainly two screens. The first screen which is shown below displays the list of Google GitHub projects with some brief information such as title, programming language, and finally number of watcher.

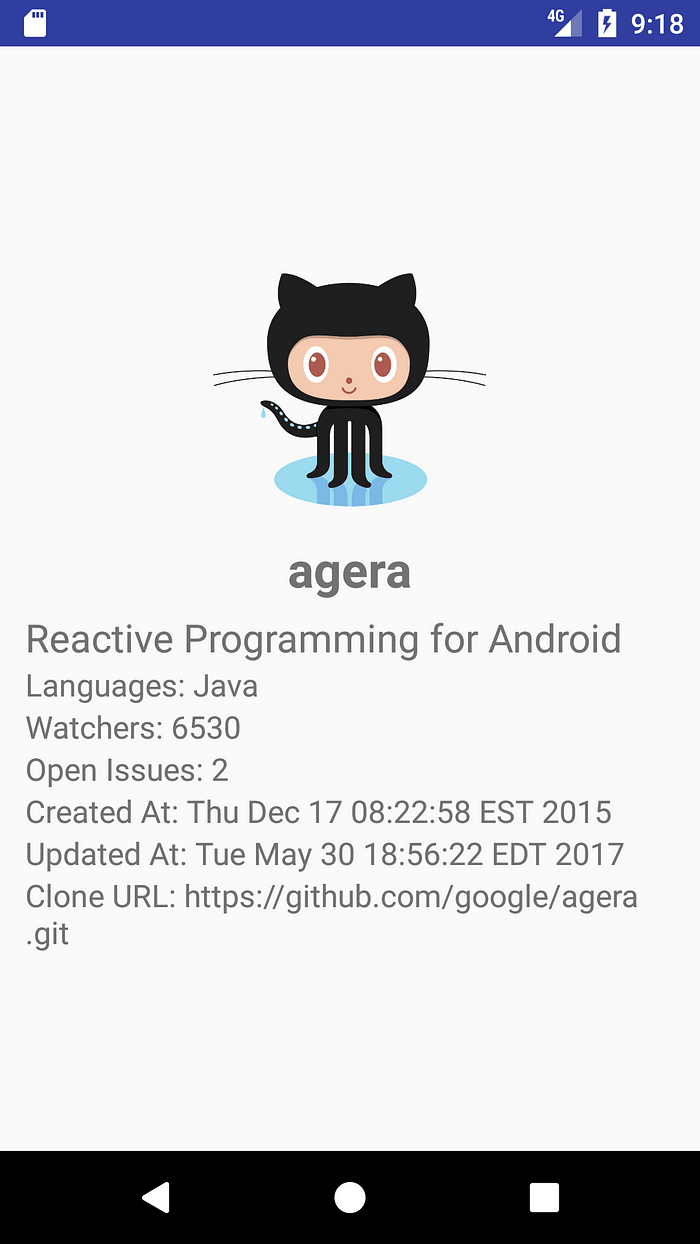
Once the app’s end user touch any of the list items, a details screen of the GitHub project appears displaying project description, programming language, number of watcher, open issues, creation and last update date, and finally the clone URL.
Sample App Interaction Diagram
The following figure shows the package structure of the Sample App

The following interaction diagram shows a sample interaction diagram of one of the app scenarios to retrieve Google GitHub projects.

As shown in the diagram, every layer observes LiveData from its subsequent layer (Fragment (View) -> ViewModel -> Repository), and finally once project list is retrieved, it is binded with the RecyclerView adapter to display the project list.
Repository modules are responsible should handle data operations. By ensuring this, Repository modules can provide a clean API to the rest of the app and simplify the job of the consumer ViewModel. Repository modules should know where to get the data from and what API calls to make when data is updated if necessary. They can be considered as mediators between different data sources (REST services, Databases, XML files, …etc).
Now, let’s explain these layers from bottom to up, starting with Model, ViewModel and finally View for retrieving GitHub projects scenario.
Sample App Model Layer
Let’s start with the business logic layer, we have two model objects
- Project, contains the information of GitHub project such as id, name, description, creation date, …etc.
- User, contains the user information of the GitHub project owner.
In order to interact with GitHub RESTful API, I used my beloved Retrofit 2 defining the following simple interface under repository package.
In order to facilitate the Job of the ViewModel, a ProjectRepository class is created to interact with GitHub service and to finally provide a LiveData object for ViewModel. It will be also used later to orchestrate service calls. The following code snippet shows getProjectList() API implementation.
ProjectRepository is the data provider for ViewModel, it has getProjectList() which simply wraps the response into LiveData Object.
For the purpose of simplicity of this article, error handling is omitted, and will be illustrated in the next article.
Sample App ViewModel Layer
In order to consume getProjectList() API, a ViewModel class (that calls the Repository API and may do any needed transformation for LiveData) is created. The following code snippet shows ProjectListViewModel class.
As shown above, our ProjectListViewModel class extends AndroidViewModel, and in the constructor, it calls getProjectList(“Google”) to retrieve Google GitHub projects.
In real world cases, a transformation may be needed before passing the result data to the Observing View, in order to make a transformation, you can use Transformation class as shown in the documentation below: https://developer.android.com/topic/libraries/architecture/livedata.html#transformations_of_livedata
Sample App View Layer
Finally, let’s give a quick look into the view layer of this app, we have mainly one Activity called MainActivity which handles the navigation of two fragments that represent the app views:
- ProjectListFragment, which displays the list of Google GitHub projects.
- ProjectFragment, which displays the selected GitHub project details.
Since Activities and Fragments are considered Life cycle owners, Activities need to extend LifecycleActivity and fragments need to extend LifecycleFragment. However, it is important to keep in mind that both LifecycleActivity and LifecycleFragment classes are temporary implementations until Lifecycles are integrated with support library:
https://developer.android.com/reference/android/arch/lifecycle/LifecycleActivity.html
Now, let’s continue our projects retrieval scenario, looking into ProjectListFragment, the following code snippet shows the most important integration part.
As shown above, ProjectListFragment gets ProjectListViewModel, and then listen to its getProjectListObservable() method in order to get the list of Github projects when ready. Finally, Once the list of projects is retrieved, it is passed to projectAdapter (the RecyclerView adapter) in order to display the list of projects in the RecyclerView component.
This is the explanation of one end-to-end scenario of the project, you can find the complete project available in GitHub here:
https://github.com/hazems/mvvm-sample-app/tree/part1
Important Guiding Principles for MVVM Implementation
Now, it is important to highlight some of the important guiding principles for MVVM implementation:
- As shown in the sample, ViewModels do not and must not reference Views directly because if this is done, ViewModels can outlive the View’s lifecycle and memory leakage can happen.
- Model and ViewModel are recommended to expose their data using LiveData since LiveData respects the lifecycle state of app components (activities, fragments, services) and handles object life cycle management which ensures that LiveData objects do not leak.
Next Articles
The story does not finish yet, since there are some things which are needed to be handled such as:
- Dependency Injection.
- Error Handling.
- Caching.
- Adding more functionality to this demo to see how can Room facilitates SQLite Data operations.
- Unit Testing.
- Others …
This will be illustrated in the next series of articles of MVVM, Stay tuned.
Finally, I would like to thank
for reviewing this article, and giving me a lot of helpful feedback.Checkout other series articles:
1. MVVM architecture, ViewModel and LiveData — Part 2 (DI): https://proandroiddev.com/mvvm-architecture-viewmodel-and-livedata-part-2-di-1a6b1f96d84b
2. MVVM architecture, ViewModel and LiveData — Part 3 (AndroidX Upgrade): https://proandroiddev.com/mvvm-architecture-viewmodel-and-livedata-part-3-androidx-upgrade-980c4fdbf9d6
If you like this article, I appreciate your support to share this article with others to let the great Android community know.
Comments
Post a Comment